Thursday, 22 November 2012
Thursday, 9 August 2012
How To Upgrade Amiko Alien 2 Enigma2 Image Via USB
INSTALLING ENIGMA2 USING SPARK PLUGIN IN AMIKO ALIEN/ALIEN 2
Upgrade Enigma2 by USB
Preparation:
1.We only recommend Kingston USB stick, we don’t support USB hard disk, you can try another usb stick.
2.Please make sure your USB stick only have 1 partition and the file system is FAT32
3.Set default booting system to [enigma2].
Upgrade Step:
1.Make sure [C:/engima2] is exist, if not, please create this folder.
2.copy [uImage] and [e2jffs2.img] to [C:/engima2]
3.Connect USB stick to STB
4.Keep Pressing [OK] Button in Front Panel, then power on STB.
5.After 5 seconds, you will see [Forc] in LED, release [OK] button and press [Right] Button.
6.if everything OK, You will see [U LD] shining in LED
7.if upgrade success, You will see [SUCC] and STB reboot automatically
If upgrade not finishes in 5 minutes, then there must be something wrong, please check your configuration and re-try.
Wednesday, 18 July 2012
How to forward CSP profiles cache to Oscam or MCS.
How to forward CSP profiles cache to Oscam or MCS.
How to forward CSP profiles cache to Oscam or MCS.
On CacheCoveragePlugin :
1- Forward to Oscam
2- Forward to MCS
Enjoy ... by Shatanar
How to forward CSP profiles cache to Oscam or MCS.
On CacheCoveragePlugin :
1- Forward to Oscam
<cache-forwarder name="oscam" type="udp" enabled="true">
<host>127.0.0.1</host>
<port>xxxx</port> <!-- where xxx is your Oscam cache port -->
<send-locks>true</send-locks>
<hide-names>false</hide-names>
<profiles>0002-0963</profiles> <!-- black for all profiles or you can write specfic profile name , here we set to sly uk profile -->
</cache-forwarder>
<host>127.0.0.1</host>
<port>xxxx</port> <!-- where xxx is your Oscam cache port -->
<send-locks>true</send-locks>
<hide-names>false</hide-names>
<profiles>0002-0963</profiles> <!-- black for all profiles or you can write specfic profile name , here we set to sly uk profile -->
</cache-forwarder>
<cache-forwarder name="Multics" type="udp" enabled="true">
<host>127.0.0.1</host>
<port>xxxx</port> <!-- where xxxx is your MCS cache port -->
<send-locks>true</send-locks>
<hide-names>false</hide-names>
<profiles></profiles> <!-- black for all profiles or you can write specfic profile name -->
</cache-forwarder>
<host>127.0.0.1</host>
<port>xxxx</port> <!-- where xxxx is your MCS cache port -->
<send-locks>true</send-locks>
<hide-names>false</hide-names>
<profiles></profiles> <!-- black for all profiles or you can write specfic profile name -->
</cache-forwarder>
How to secure (encrypt) CSP connectors & user xml
How to secure (encrypt) CSP connectors & user xml
The connectors.xml &users.xml can be stored anywhere, as long as it can be accessed via url (e.g file://, http, https, ftp). Optionally, the list can also be blowfish encrypted using the included tool fishenc.jar (found in lib, java -jar fishenc.jar). If encrypted, tracker-key must be correctly set.
In the below example we are going to encypt connectors.xml & users.xml
Using any ftp program copy the files connectors.xml & users.xml to a different PC rather than your CSP server, then delete the files connectors.xml & users.xml from your CSP server.
Finally update your proxy.xml with:
and
Enjoy..
By Shatanar
The connectors.xml &users.xml can be stored anywhere, as long as it can be accessed via url (e.g file://, http, https, ftp). Optionally, the list can also be blowfish encrypted using the included tool fishenc.jar (found in lib, java -jar fishenc.jar). If encrypted, tracker-key must be correctly set.
In the below example we are going to encypt connectors.xml & users.xml
cd /usr/local/csp/lib
java -jar fishenc.jar /usr/local/csp/config/connectors.xml /usr/local/csp/config/connector.enc 12345 <!-- where 12345 is your tracker key - (password) -->
java -jar fishenc.jar /usr/local/csp/config/users.xml /usr/local/csp/config/users.enc 12345 <!-- where 12345 is your tracker key - (password) -->
Finally update your proxy.xml with:
<user-source name="localusers">
<user-file-url>file:///usr/local/csp/config/users.enc</user-file-url>
<user-file-key>12345</user-file-key>
<user-file-url>file:///usr/local/csp/config/users.enc</user-file-url>
<user-file-key>12345</user-file-key>
<connector-file-url>file:///usr/local/csp/config/connector.enc</connector-file-url>
<connector-file-key>12345</connector-file-key>
<connector-file-key>12345</connector-file-key>
By Shatanar
HOWTO: Compile OSCAM on Raspberry Pi, Dockstar or similar NAS running Debian
HOWTO: Compile OSCAM on Raspberry Pi, Dockstar or similar NAS running Debian
1. Preparations:
Update apt-list and install required packes:
If you need PCSC support:
2. Get OSCAM source
Now switch to /usr/src, create a directory for oscam and download sources:
3. Compile OSCAM
Now compile oscam for your machine:
NOTE: If you get Errors while compiling e.g.
See the hint at the bottom before proceeding
Now we got our oscam binary
We're gonna move it to /var/local
there should be a file called "oscam"
So lets copy it:
4. Make OSCAM start at system startup:
We're adding oscam to rc.local to make it start at system boot.
Now add
right above line
Oscam will start everytime the system boots up from now on
5. configs and logfiles
We still need to get some config files.
By default oscam looks in /usr/local/etc for these file
There should be at least 3 files: oscam.user, oscam.server, oscam.conf
If not, copy your configs here
Now we need to create some logfiles and make them writable:
Thats it
6. Start oscam
You can now run oscam to check if it works
HINT: Oscam compile error: No smartreader support:
If you get Errors while compiling e.g.
go to /usr/src, get libusb 1.0.6 from sourceforge and compile for your system:
After make install of libusb, start over with compiling oscam
1. Preparations:
Update apt-list and install required packes:
Code:
apt-get update
apt-get -y install apt-utils dialog usbutils
apt-get -y install gcc g++ wget
apt-get -y install build-essential subversion libpcsclite1 libpcsclite-dev
apt-get -y install libssl-dev cmake make
apt-get -y install libusb-1.0-0-dev nano
If you need PCSC support:
Code:
apt-get install pcscd pcsc-tools
2. Get OSCAM source
Now switch to /usr/src, create a directory for oscam and download sources:
Code:
cd /usr/src
svn co http://www.oscam.to/svn/oscam/trunk oscam-svn
3. Compile OSCAM
Now compile oscam for your machine:
Code:
cd oscam-svn
mkdir build
chmod 755 build
cd build
cmake -DWEBIF=1 .. (those 2 dots are required. THIS IS IMPORTANT)
make
NOTE: If you get Errors while compiling e.g.
Code:
-- no libusb 1.0 found. No smartreader support
Now we got our oscam binary
We're gonna move it to /var/local
Code:
cd /usr/src/oscam-svn/build
ls
So lets copy it:
Code:
cp oscam /var/local/
cd /var/local
chmod 755 oscam
4. Make OSCAM start at system startup:
We're adding oscam to rc.local to make it start at system boot.
Code:
nano /etc/rc.local
Code:
/var/local/oscam &
Code:
exit 0
5. configs and logfiles
We still need to get some config files.
By default oscam looks in /usr/local/etc for these file
Code:
cd /usr/local/etc
ls
If not, copy your configs here
Now we need to create some logfiles and make them writable:
Code:
cd /var/local
mkdir oscam
chmod 755 oscam
cd oscam
mkdir cw
chmod 755 cw
nano oscamuser.log (enter a space and save file)
nano oscam.log (enter a space and save file)
chmod 755 oscamuser.log
chmod755 oscam.log
6. Start oscam
You can now run oscam to check if it works
Code:
cd /var/local
./oscam
HINT: Oscam compile error: No smartreader support:
If you get Errors while compiling e.g.
Code:
-- no libusb 1.0 found. No smartreader support
Code:
cd /usr/src/
mkdir libusb
chmod 755 libusb
cd libusb
wget http://downloads.sourceforge.net/project/libusb/libusb-1.0/libusb-1.0.6/libusb-1.0.6.tar.bz2
tar xjf libusb-1.0.6.tar.bz2
make
install
Sunday, 15 July 2012
Tuesday, 10 July 2012
Useful Ubuntu OScam CCcam Commands
Useful Ubuntu OScam CCcam Commands
Ubuntu System Commands
Power Commands
Shutdown computer
reboot computerCode:sudo shutdown -h now
orCode:sudo reboot
Network ConfigurationCode:sudo shutdown -r 0
Open network configuration file
Restart the network:Code:sudo nano /etc/network/interfaces
UpdatesCode:sudo /etc/init.d/networking restart
Get update software list, enter:
Update software(s) i.e. apply updates:Code:sudo apt-get update
Apply kernel upgrade:Code:sudo apt-get upgrade
Upgrade individual software called foo type command:Code:sudo apt-get dist-upgrade
PingCode:sudo apt-get install foo
CleanCode:Ping –c3 www.google.ie
To clear the cache you can use either the clean or the auto-clean op for a command-line program called apt-get. The clean command will remove every single cached item, while the auto-clean command only removes cached items that can no longer be downloaded (these items are often unnecessary).
List Devices attached:Code:sudo apt-get clean
Checking open ports on UbuntuCode:sudo lsusb
Enable root accountCode:netstat -anltp | grep "LISTEN"
Chmod for a folder and all of its subfolders and files?Code:sudo passwd root
Code:sudo chmod 755 -R /whatever/your/directory/is
Oscam/Cccam commands
Update cccam.cfg file?
ftp updated cccam.cfg file to /var/config then run command below:
Stop oscam:Code:/var/script/configupdate.sh
Start oscam:Code:sudo killall -9 oscam
Log file:Code:sudo oscam –b
Edit oscam.server:Code:tail -f /var/log/oscam.log
Edit oscam.user:Code:sudo pico /usr/local/etc/oscam.server
Edit oscam.conf:Code:sudo pico /usr/local/etc/oscam.user
Update CCcam Channel InfoCode:sudo pico /usr/local/etc/oscam.conf
Update CCcam ProvidersCode:wget -O /var/etc/CCcam.channelinfo http://tinyurl.com/csmcu44
Clean oscam/cccam Log FilesCode:wget -O /var/etc/CCcam.providers http://tinyurl.com/cgo8ogc
Code:/var/script/LogCleanup.sh
Friday, 6 July 2012
Alternative method to backup Linux Ubuntu / Debian Server in 5 Easy Steps
Alternative method to backup Linux Ubuntu / Debian Server in 5 Easy Steps.
From time to time you might want to make big changes to your server, changes that might involve risking server stability. You might also want try another Operating System (Switch from Debian to Ubuntu or vice versa) or upgrade from 32Bit OS to 64 Bit OS. Most of these tasks involve the risk of big downtime. I am going to outline a few simple steps to keep downtime to an absolute minimum no matter how big the Upgrade or problem. This Tutorial might seem a bit long winded but it is aimed at the complete novice. After you have done this once, the whole process will take no more than 5 minutes.
Tools you will Need:
a)…Hiren’s Boot DVD 15.1 Restored Edition V 2.0 (Not the genuine version)
Click on the link below to open up a google search window with results for the Torrent file we need (If you wish, you can change “KAT” at the end to your preferred torrent site)
Google
Make sure it is the restored edition, this edition includes all the commercial software that you don’t get with the official Hiren’s Boot DVD.
b)… Blank DVD
c)… USB Key or portable Hard Drive to store the Backup’s on. (I use 8GB USB Key)
Step 1 (Burning the DVD)
Within the folder you will find the “hbcd-15.1-Restored-V2.0-dvd-proteus.iso”. Insert your Blank DVD & burn this iso to a blank DVD with your favourite DVD burning software. (I use windows Disk burner included in Win7, Just right click on the file & click burn disk image) You now have your Hirens Boot DVD.
Step 2 (Creating the backup)
For this step you will need a keyboard, mouse & monitor connected to your Server.
a)… Put the DVD into your server & click CTR+ALT+DEL to restart Server
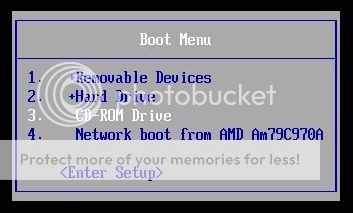
b)… Press F12 at boot logo Screen to select Boot Device (Might be different on different Systems)
c)… From Boot Device Menu Select CD\DVD Drive & hit enter (This will boot your server from the DVD)
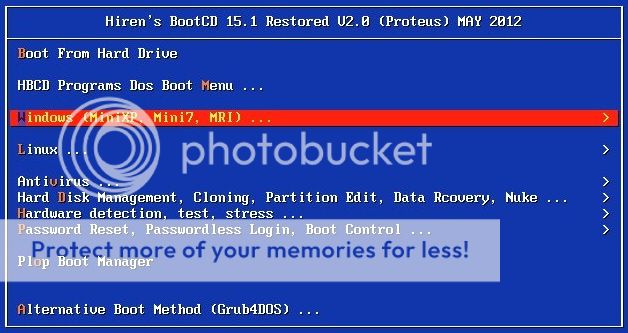
d)… From the first screen, select Windows (Mini-XP, Mini7, MRI)
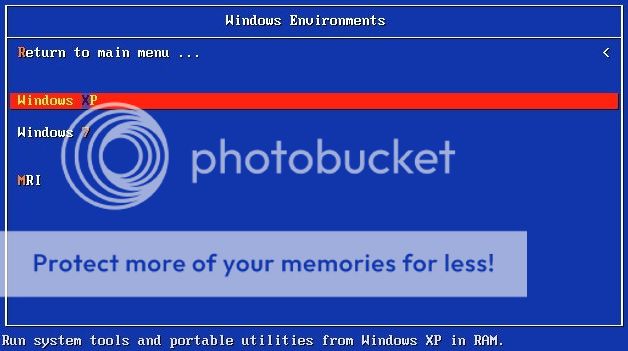
e).. From the next screen select Windows XP
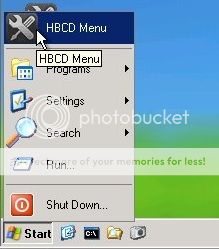
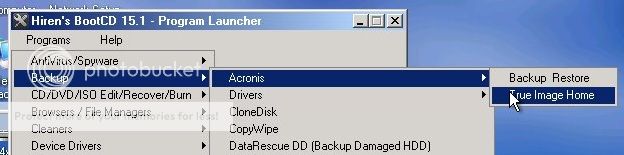
f)… When the Mini XP OS loads, click on the Start button and HBCD
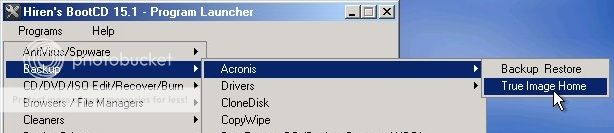
g)… From the HBCD select programs / Backup / Acronis / True image Home
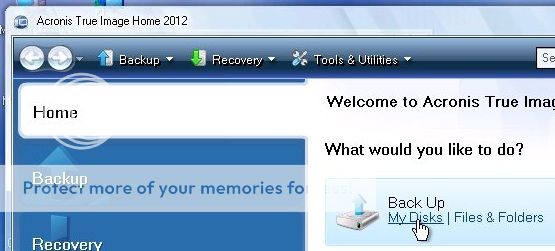
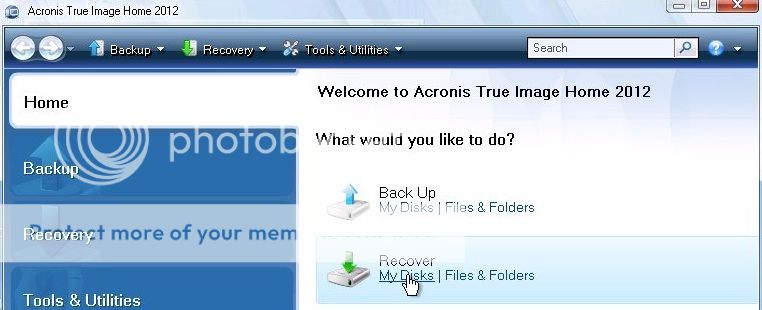
h).. When Acronis True image Home loads, click Backup My Disks
i).. From the next screen, Select your Ubuntu / Debian hard drive

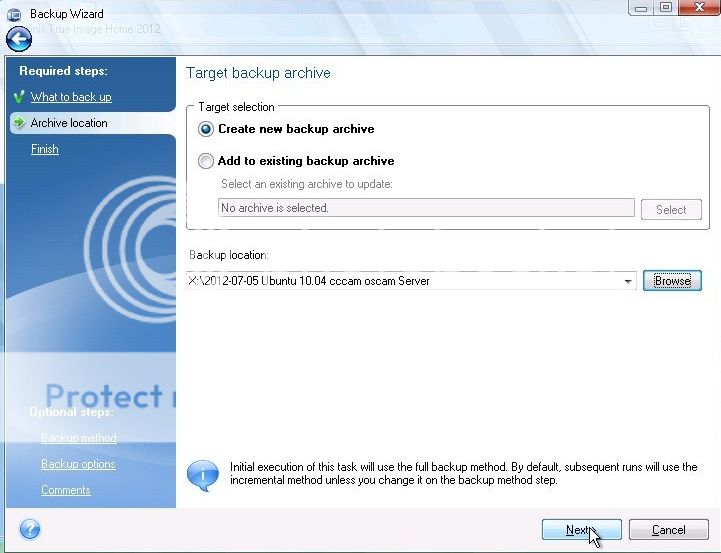
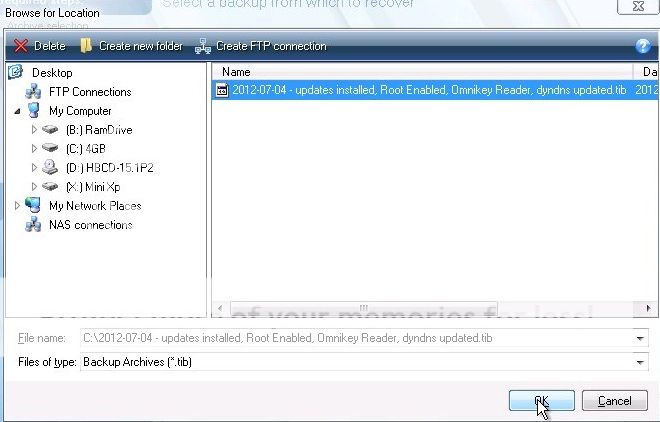
j).. From the new (Browse for location) window select where you want to store the backup, then in the File name box type a name for the Backup image. I usually use todays date followed by a description of the backup.
e.g.(2012-07-05 Ubuntu 10.04 Oscam Cccam)

k).. Select Create new backup archive and click Next
That’s it, your Backup has started, it should take no more than 1-2 minutes.
(Restoring the Backup)
Step 3 (Wiping the existing Linux Disk)
Follow Steps (a) through (f) from Step 2 above to start Hirens Boot CD then follow steps below
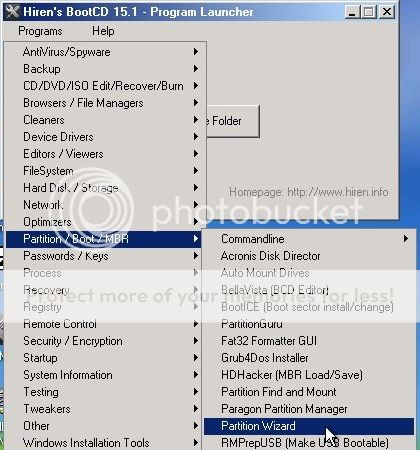
i).. From the HBCD select programs / Partition Boot MBR / Par4tition Wizard
ii).. From the Partition Wizard Window, right click on your Linux Disk and Select Delete all Partitions
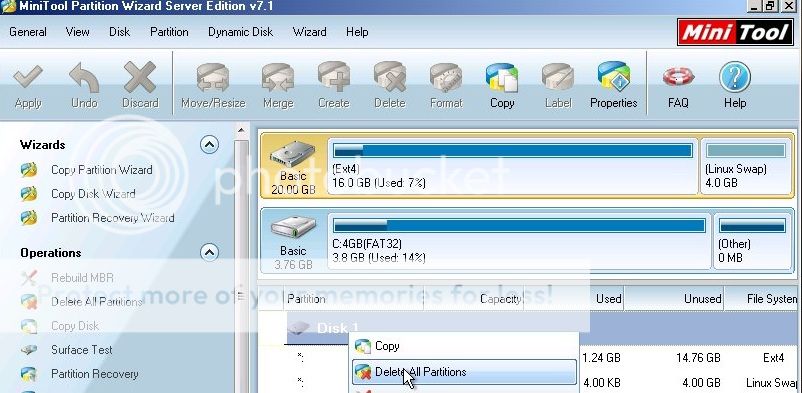
iii).. Next click Apply up the top left and Close down Partition Wizard

Step 4 (Restoring Backup to Wiped Disk)
i).. From the HBCD select programs / Backup / Acronis / True image Home
ii).. When Acronis True image Home loads, click Recover My Disks
iii) Browse to the backup you want to restore and click OK
iv).. Click Next on this screen

v).. Select Recover whole disks and partitions and click Next
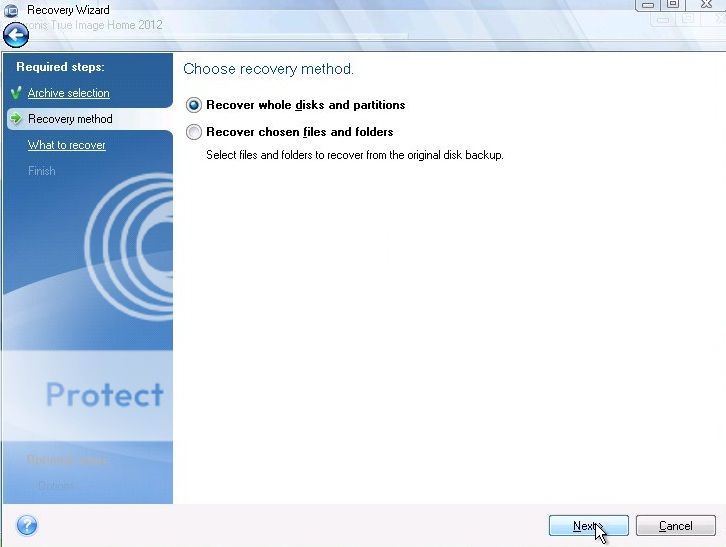
vi).. Select Disk 1 and make sure to select all partitions below it and click Next

That is the restore process started, again it should take no longer than 2 minutes.
Step 5 Reboot into restored Disk
1).. Remove the DVD
2).. Unplug the USB Backup drive/Key
3).. Click Start / Reboot
That’s it, your Linux System has been restored to the backed up image.
From time to time you might want to make big changes to your server, changes that might involve risking server stability. You might also want try another Operating System (Switch from Debian to Ubuntu or vice versa) or upgrade from 32Bit OS to 64 Bit OS. Most of these tasks involve the risk of big downtime. I am going to outline a few simple steps to keep downtime to an absolute minimum no matter how big the Upgrade or problem. This Tutorial might seem a bit long winded but it is aimed at the complete novice. After you have done this once, the whole process will take no more than 5 minutes.
Tools you will Need:
a)…Hiren’s Boot DVD 15.1 Restored Edition V 2.0 (Not the genuine version)
Click on the link below to open up a google search window with results for the Torrent file we need (If you wish, you can change “KAT” at the end to your preferred torrent site)
Make sure it is the restored edition, this edition includes all the commercial software that you don’t get with the official Hiren’s Boot DVD.
b)… Blank DVD
c)… USB Key or portable Hard Drive to store the Backup’s on. (I use 8GB USB Key)
Step 1 (Burning the DVD)
Within the folder you will find the “hbcd-15.1-Restored-V2.0-dvd-proteus.iso”. Insert your Blank DVD & burn this iso to a blank DVD with your favourite DVD burning software. (I use windows Disk burner included in Win7, Just right click on the file & click burn disk image) You now have your Hirens Boot DVD.
Step 2 (Creating the backup)
For this step you will need a keyboard, mouse & monitor connected to your Server.
a)… Put the DVD into your server & click CTR+ALT+DEL to restart Server
b)… Press F12 at boot logo Screen to select Boot Device (Might be different on different Systems)
c)… From Boot Device Menu Select CD\DVD Drive & hit enter (This will boot your server from the DVD)
d)… From the first screen, select Windows (Mini-XP, Mini7, MRI)
e).. From the next screen select Windows XP
f)… When the Mini XP OS loads, click on the Start button and HBCD
g)… From the HBCD select programs / Backup / Acronis / True image Home
h).. When Acronis True image Home loads, click Backup My Disks
i).. From the next screen, Select your Ubuntu / Debian hard drive
j).. From the new (Browse for location) window select where you want to store the backup, then in the File name box type a name for the Backup image. I usually use todays date followed by a description of the backup.
e.g.(2012-07-05 Ubuntu 10.04 Oscam Cccam)
k).. Select Create new backup archive and click Next
That’s it, your Backup has started, it should take no more than 1-2 minutes.
(Restoring the Backup)
Step 3 (Wiping the existing Linux Disk)
Follow Steps (a) through (f) from Step 2 above to start Hirens Boot CD then follow steps below
i).. From the HBCD select programs / Partition Boot MBR / Par4tition Wizard
ii).. From the Partition Wizard Window, right click on your Linux Disk and Select Delete all Partitions
iii).. Next click Apply up the top left and Close down Partition Wizard
Step 4 (Restoring Backup to Wiped Disk)
i).. From the HBCD select programs / Backup / Acronis / True image Home
ii).. When Acronis True image Home loads, click Recover My Disks
iii) Browse to the backup you want to restore and click OK
iv).. Click Next on this screen
v).. Select Recover whole disks and partitions and click Next
vi).. Select Disk 1 and make sure to select all partitions below it and click Next
That is the restore process started, again it should take no longer than 2 minutes.
Step 5 Reboot into restored Disk
1).. Remove the DVD
2).. Unplug the USB Backup drive/Key
3).. Click Start / Reboot
That’s it, your Linux System has been restored to the backed up image.
Sunday, 1 July 2012
PELIS A LA CARTA ( Spanish idiom for Videos On Demand )
PELIS A LA CARTA ( Spanish idiom for Videos On Demand )
PELIS A LA CARTA ( Spanish idiom for Videos On Demand )
Another VOD which is still in the making which was originally setup for dreambox but this one considers our Non-English speaking friends also:
PELIS A LA CARTA ( Spanish idiom for Videos On Demand )Version 3.2.12
It links to Spanish,Italian and English sites.
Although initially it was created for Dreambox , the images below were taken from my Vu+ UNO
I have made an IPK so you don´t have to worry about looking for folders!
The procedure is the same for any IPK , FTP to /tmp and install ipk package.
or directly from linuxsat-support addons server in TSpanel.
Do a HARD system reboot not just GUI or some audio might falter.
Always consider that the film/movie/show/documentary is only available if it is kept uploaded and the site link is up-to-date.
Motion Flow depends on several factors ,i.e ; user internet downloading speed/connection ,server uploading speed/connection,etc...
Here are two examples :
Documentaries
Tv shows
Some images may require added plugins for avi , flv or rtsp which I have included the IPKs
If you want to manually install the folder then Ftp the complete folder to /usr/lib/enigma2/python/Plugins/Extensions then hard reboot box, or directly from linuxsat-support addons server in TSpanel.


Thursday, 12 April 2012
How to : Ferguson Ariva 102E Setup Guide
How to : Ferguson Ariva 102E Setup Guide
Hi this for ferguson ariva 102e hd
How to upgrade the firm with a patched one.
Easy with usb stick and handset.
Put the firm on your usb.
Put it into the ariva front usb
Go to menu “tools” - upgrade by usb
Upgrade mode is “allcode-bootloader”
Upgrade file is of course your firm patched, depends if you have more files on your usb,like me. Easier have only the firm on usb.
Ok and start.
Box will automatic restart and you can go on and fill the lines in if your for cs.
Where to put c-lines, or others well
“tools” – network local settings –
Now you should have a option for “app selected” (if not your fw is not patched)
Where you choose your cam.
And you should see down on the page a red button and this is your door to paradise.
Ok press the red one and fill out – autoconnect –restart and wow.
Ferguson avira 102 e hd
How to save your channel list
And upload it to other aviras box
To make the channel list file:
Insert USB stick
(2) Go to Menu->Tools->Upgrade By USB
(3) As upgrade mode please choose: dump
(4) Start
(5) You will then have a file called "Dumpfile.abs" on the memory stick.
You can call it whatever you want, just leave it abs format.
To upload the channel list to another ariva 102! save a friend 3 hours of head age, make one and upload it here please.
(1) Insert USB stick
(2) Go to Menu->Tools->Upgrade By USB
(3) As upgrade mode please choose: userdb
(4) Upgrade file - toggle left or right to chose the file with your channel list
(5) Start
it might want a reboot and then........
Hope this helps
El pirate
Monday, 27 February 2012

Friday, 24 February 2012
Cron configuration instruction to the receiver of Enigma2
Cron configuration instruction to the receiver of Enigma2
Cron configuration instruction to the receiver of Enigma 2
Hi
Enigma 2 Receivers facilities are superb and the same potential that I know many of these capabilities.
Cron is the name of one of these capabilities.
We have a program or command in a Cron job to run automatically provide a point of time.
Now that our program is a shell script that I rebooted the server, or even instead of a command to give, For example, "every seven days, a date that represents the time and date command is run.
All this is done by Cron.
Cron service always runs in the Background and permanently.
Cron is the sex of my files in your /etc/cron.d/ is located, to understand this in your server address enter the following command in SSH:
Cron service always addresses /etc/cron.d and /var/spool/cron/ checks.Code:ls -la cron
How to install and create Cronjobs:
Using Cronjobs:Code:crontab -e
orCode:1 2 3 4 5 /path/to/command arg1 arg2
Description:Code:1 2 3 4 5 /root/script.sh
1 minutes (0-59)
2: Time (0-23)
3 days (0-31)
4: Month (0-12 [12 == December])
5: Day of week (0-7)
Command: /path/to/command/ - Script or command must be run.
View all Crontab jobs:
Clear CronTab Jobs:Code:crontab -l crontab -u username -l
Contents of a file /etc/crontab/:Code:crontab -r crontab -r -u username
Code:SHELL=/bin/bash PATH=/sbin:/bin:/usr/sbin:/usr/bin MAILTO=root HOME=/ # run-parts 01 * * * * root run-parts /etc/cron.hourly 02 4 * * * root run-parts /etc/cron.daily 22 4 * * 0 root run-parts /etc/cron.weekly 42 4 1 * * root run-parts /etc/cron.monthly
Description directories:
All scripts that want to run here and leave their name in the /etc/cron.d/ are.Code:/etc/crontab file.
All scripts that are executed only once a day:Code:/etc/cron.daily/
All scripts that are executed each only once per hour:Code:/etc/cron.hourly/
All scripts that are executed at once:Code:/etc/cron.monthly/
How to use this directory to run our script?Code:/etc/cron.weekly/
We want the script with clean.cache delete the cache will run every 10 days. This script file in /etc/cron.daliy/ put.
So we have a file with this address: /etc/cron.daily/clean.cache/ that its contents are as follows:
Code:#!/bin/bash # A sample shell script to clean cached file from lighttpd web server CROOT=”/tmp/cachelighttpd/” DAYS=10 LUSER=”lighttpd” LGROUP=”lighttpd” # start cleaning /usr/bin/find ${CROOT} -type f -mtime +${DAYS} | xargs -r /bin/rm # if directory deleted by some other script just get it back if [ ! -d $CROOT ] then /bin/mkdir -p $CROOT /bin/chown ${LUSER}:${LGROUP} ${CROOT} fi
How to backup Cronjob Started:
I hope to be useful.Code:crontab -l > /backup/cron/cronjobs.bakup crontab -u username -l > /backup/cron/cronjobs_username.bakup
by Eminem
Good luck
Thursday, 23 February 2012
Tutorial : Lock smargo card reader to specific usb port
To fix smargos on specific ports you have to load smargos with 1.5 firmware.
When you compile oscam on Yr pc You have also a small bin called list_smargo. Give this bin chmod 755 and insert the smargos (as much as You want) in Yr pc.
Run list_smargo and on terminal you have:
Looking for smartreader with an out endpoint = 0x82 :
bus 003, device 002 : 0403:6001 Smartreader (Device=003:002 EndPoint=0x82 insert in oscam.server 'Device = Serial:Reader 6CD3C34')
bus 003, device 003 : 0403:6001 Smartreader (Device=003:003 EndPoint=0x82 insert in oscam.server 'Device = Serial:Reader 3A0E6AB')
bus 008, device 002 : 0403:6001 Smartreader (Device=008:002 EndPoint=0x82 insert in oscam.server 'Device = Serial:Reader 878FB20')
bus 008, device 003 : 0403:6001 Smartreader (Device=008:003 EndPoint=0x82 insert in oscam.server 'Device = Serial:Reader C2AC705'
I.e each smargo has now a serial number of its own.
In oscam server use this syntax in reader part:
protocol = smartreader
device = Serial:Reader C2AC705
and bind any card you want
do the rest for other cards and now You have fixed smargos and the cards and they never mix even if on restart or changing them from pc to pc.
How to "Oscam check script"
How to "Oscam check script"
Thanks arber for the script, i have made ipk file for BlackHole image, to restart EMU at 8am and run oscamcheck script every 10 minutes.
FTP to /tmp > Green button > Yellow button > Manual Install IPK Packages
You can test the script is working by telnet command, killall -9 oscam wait a few minutes and check var/log/oscam_restart_log.
You should get process was not working, which means the script is working and oscam was restarted.
Enjoy..
Thursday, 16 February 2012
Monday, 13 February 2012
VTI Image Softcam Collection
Download VTI Image Softcam Collection
Camd v3908-VTI CCcam v2.0.11+Mgcamd v138-VTI CCcam v2.0.9-VTI CCcam v2.1.0-VTI CCcam v2.1.1-VTI CCcam v2.1.3-VTI CCcam v2.1.4-VTI CCcam v2.2.1-VTI CCcam v2.3.0-VTI CCcam v2.1.3+NewCS v171-VTI Evocamd v217-VTI Gbox v800-VTI Hypercam v218-VTI Mgcamd v138-VTI Mgcamd v138+NewCS v171-VTI oscam v6380-VTI oscam v6380+CCcam v2.1.3-VTI oscam v6380+Mgcamd v138-VTI rqcs v1.11+CCcam v2.1.3-VTI Sbox v0051-3-VTI Sbox v0051-3+CCcam v2.1.3-VTI Sbox v0051-3+Mgcamd v138-VTI Scam v360-VTI
Friday, 10 February 2012
Thursday, 9 February 2012
Sunday, 5 February 2012
ecmwhitelist - What is it? How do I maintain it?
ecmwhitelist - What is it? How do I maintain it?
ecmwhitelist - What is it? How do I maintain it?
OSCam has a reletively new feature called ecmwhitelist. What this feature does is allow a user to define valid ECM lengths a particula card, therefore blocking anything unusual in length. A lot of people see this feature as a way to stop providers blocking cards, as it prevents anything unusual reaching it.
This whitelist goes in oscam.server in the appopriate reader entry for your local card. The first part defines the CAID, then after the @ you have your ident, and then after the colon (:) you have your allowed ECM hex lengths. If your card has multiple CAID/Idents, then just add another entry, making sure each entry is separated by a semicolon (;)
The above is the entry I have for my JSC Sports card, which is being read in OSCam. Not too long ago, it was a bit different as below;Code:ecmwhitelist = 0500@042400:52,57
I found today that my card wasn't clearing channels. I eventually discovered this was why.Code:ecmwhitelist = 0500@042400:2F,2A
Problem. Sometimes, the length of the ECM can change. The provider will sometimes tweak things. You want to save your card from being murdered, but the provider has changed something, and you can't watch your channels anymore.
Solution. Quite simple really, you need to know where you get the information from to obtain the hex code that describes the length of the ECM. If you are running OSCam Web Interface, then all you need to do is look at a line of information. This is from JSC Sports +8 The following information will be in your log files, but I prefer to read it straight from the status page of the Web Interface.
The above tells me that the hex length of the ECM is 52 (as highlighted in red). I now know that I can add that to the ecmwhitelist. I also discovered a length of 57, so I added both, and so far that is working.Code:2012/02/04 23:38:12 ABC123 c jsc (0500&042400/20FC/52:9827): found (303 ms) by upper_slot
Knowing this allows you to build your own lists. I am still not so sure about these supposed killer ECMs or EMMs, but I do know that it is good to be restrictive, but being restrictive sometimes blocks things out, so if you ever see a channel not clearing on your card that should be, as well as your services, check the ECM whitelist against the ECM on your OSCam log, because that could be what has changed!
Thursday, 2 February 2012
Monday, 30 January 2012
How to: Install Multics
How to: Install Multics
1- Extract the zip file into a folder, and move to this folder.
2-
*if you dont have have the directory /usr/local/bin, create it
*For 32bits: copy the file "multics.x32" to /usr/local/bin
*For 64bits: copy the file "multics.x64" to /usr/local/bin
3- change file propriety to executable
4- copy the file "multics.cfg" to /var/etc
After installation edit your config and execute the next command:
if you want debug info execute:
How to: Install Multics
to install multics on a pc linux:1- Extract the zip file into a folder, and move to this folder.
2-
*if you dont have have the directory /usr/local/bin, create it
Code:
mkdir -p /usr/local/bin
Code:
cp multics.x32 /usr/local/bin/multics
Code:
cp multics.x64 /usr/local/bin/multics
Code:
chmod 755 /usr/local/bin/multics
Code:
cp multics.cfg /var/etc
After installation edit your config and execute the next command:
Code:
./multics -b
Code:
./multics -b -v
Tutorial: How to install CSP
Tutorial: How to install CSP
Tutorial: How to install CSP
This Tutorial is designed to help load CSP from start to finish up and running
I will split posts to section out each part required.
Question, What do you need for CSP ???
Answer, Well for this Tutorial you will need a Linux based PC, ie Debian or Ubuntu,
also another emu already loaded such as newcs or oscam ( This is Required to get your local Card operational.)
CSP runs in a Java Environment and for the newer updated versions Sun Java6 so lets get that installed first.
Friday, 27 January 2012
How to setup and use BH Tuner Server with 2 Vu+ Box's
How To : BlackHole Vu+ Tuner Server
This is a guide on how to setup Vu+ Tuner Server sharing between two receivers, i`m using an ultimo and duo
This is a guide on how to setup Vu+ Tuner Server sharing between two receivers, i`m using an ultimo and duo
Thursday, 26 January 2012

Sunday, 22 January 2012
Friday, 20 January 2012
Wednesday, 18 January 2012
Easy install of oscam on Enigma2 ( mips-tuxbox ) based STB .
More info at this link ~ Easy install of oscam on Enigma2 ( mips-tuxbox ) based STB .
[TUTORIAL] Easy install of OScam on Enigma2 (mips-tuxbox) based STB without the need of any third party plugin or SoftCam Manager pre-installed.
Goal:
Install OSCam on a STB running Enigma2 (mips-tuxbox plateform) without the need of another plugin or a softcam manager.
This way of working should work for almost any E2 image, there will be no integration with any SoftCam Manager but we will install a very good plugin dedicated to OScam, which will allows you to control the OScam status and even restart it: OScamStatus.
Pre-requisite:
- a linux Enigma2 based STB on which you can run OScam in its mips-tuxbox version (to be able to use the pack like it is)
- your stb should have an internal card reader referenced by /dev/sci0
- being able to connect to your STB in telnet and FTP (with DCC or any other program)
- being able to follow and type some simple commands or being able to do cut and paste :-)
- we consider that your STB has no other running softcam before following this tutorial (typically on a brand new E2 image installation). If another softcam is running, it can prevent OScam from running properly.
Installation:
Take the pack attached to this tutorial (easy-oscam.tgz).
Transfer the pack in the folder /tmp of your E2 STB by FTP.
Connect via telnet and type the following commands (or even better make cut and paste) the cd / at the very beginning is really important don't skip it:
Code:cd /Code:tar -xvzf /tmp/easy-oscam.tgzYour STB will make a full reboot.Code:/tmp/oscam-install.sh
Now you have:
- OScam installed on your STB in the folder /usr/bin and the configuration files are in /var/tuxbox/config
- OScam will autostart when you reboot your STB.
- OScam is active in dvbapi mode so it is self sufficien, no need for any other softcam to run.
- The web interface of OScam is accessible from http://ip_address_of_receiver:16001 (Login: username password: password)
- The internal card reader /dev/sci0 is enabled
- The plugin Oscam Status release 0.41-r0 is installed
With the plugin OScam Status you can control the status and even restart your OScam, no need to any SoftCam Manager integration specific for each image.
It should appears in your Plugins list. If you change the login / password of the OScam webif, don't forget to change it too in the Oscam Status plugin otherwhise it won't work anymore.
Good to know:
The OScam executable is installed into the folder /usr/bin
The OScam configuration files are placed into the folder /var/tuxbox/config
If you want to test a newer version of OScam you just need to:
- Copy the new executable version (we will call it: The_New_Name_of_the_new_version) into the /usr/bin folder.
Go in telnet and type:
Code:cd /usr/binCode:killall oscamCode:rm oscamCode:ln -s The_New_Name_of_the_new_version oscamCode:chmod 755 oscamCode:syncCode:syncThanks to PR2 from oscam.to forumCode:reboot -f
Friday, 13 January 2012
How To: Vu+ SOLO Boot Loader Upgrade
How To: Vu+ SOLO Boot Loader Upgrade
The CFE image of Vu+ Solo is updated.
The main difference from the old one is supporting the large size image more than 48MB.
Please see the detailed explanation of update as below.
Unzip the solo_cfe_2.0_usb.zip to USB stick. (There should be /vuplus/solo/cfe_cfe_auto.bin)
Insert USB stick into the USB port of solo and power on the box.
It takes just a few secs to update.
If solo's front led blinks continuously, restart box.
To proceed with image update, you should delete the cfe_cfe_auto.bin at /vuplus/solo in USB stick once bootloader update is finished.
Thursday, 12 January 2012
LCD skins VUplus Ultimo
LCD skins VUplus Ultimo
Heres my skin_user.xml mod!
If a picon exists for a channel, it is displayed....if there is no picon then just the text for the channel name is displayed,
I've removed the clock and increased the length of the program name to avoid clipping and scrolling!
WIP of course! just replace the skin_user.xml file in /etc/enigma2/ and picon_default.png in your piconlcd path!
How to setup an Enigma2 Box with VBox II DiSEqC 1.2 Positioner.
How to setup an Enigma2 Box with VBox II DiSEqC 1.2 Positioner.
How to setup Vu+ with VBox II DiSEqC 1.2 Positioner.
If your VBox II already has the satellite positions stored and your changing from an old receiver to Vu+ then follow this procedure.
Write down your VBox II satellite position numbers. These are the numbers displayed on the front of the VBox II when moving to a
specific satellite position. These position numbers can also be found in your old receivers motor setup menu.
Example lets say...
Position 1 on VBox II = Astra 19e
Position 2 on VBox II = Eutelsat W2 16e
Position 3 on VBox II = Hotbird 13e
You get the idea...
First send the dish to Astra 19e using Vbox II.
On Vu+ Remote Press Menu
Select Setup Press OK
Select Service Searching Press OK
Select Tuner configuration Press OK
Select Tuner A Press OK
Now set Configuration Mode to Advanced. Use Left or Right keys on remote to select.
Scroll down to botton of the page with the down arrow on remote.
Stored position: 001
Press OK to store.
OK that's Astra 19e setup now to setup Eutelsat W2 16e
Now send the dish to Eutelsat 16E using Vbox II.
Select Setup Press OK
Select Service Searching Press OK
Select Tuner configuration Press OK
Select Tuner A Press OK
Scroll down to botton of the page with the down arrow on remote.
Stored position: 002
Press OK to store.
OK that's Eutelsat W2 16e setup now to setup Hotbird 13e
Now send dish to Hotbird using Vbox II
Select Setup Press OK
Select Service Searching Press OK
Select Tuner configuration Press OK
Select Tuner A Press OK
Scroll down to botton of the page with the down arrow on remote.
Stored position: 003
Press OK to store.
You get the idea, now repeat for the rest of the satellites and your done.
This is enough to get you started, the fun starts learning the rest.
How to setup Vu+ with VBox II DiSEqC 1.2 Positioner.
If your VBox II already has the satellite positions stored and your changing from an old receiver to Vu+ then follow this procedure.
Write down your VBox II satellite position numbers. These are the numbers displayed on the front of the VBox II when moving to a
specific satellite position. These position numbers can also be found in your old receivers motor setup menu.
Example lets say...
Position 1 on VBox II = Astra 19e
Position 2 on VBox II = Eutelsat W2 16e
Position 3 on VBox II = Hotbird 13e
You get the idea...
First send the dish to Astra 19e using Vbox II.
On Vu+ Remote Press Menu
Select Setup Press OK
Select Service Searching Press OK
Select Tuner configuration Press OK
Select Tuner A Press OK
Now set Configuration Mode to Advanced. Use Left or Right keys on remote to select.
Code:
Configuration Mode: Advanced Satellite: Astra 19e LNB: 1 DiSEqC mode: 1.2
Stored position: 001
Press OK to store.
OK that's Astra 19e setup now to setup Eutelsat W2 16e
Now send the dish to Eutelsat 16E using Vbox II.
Select Setup Press OK
Select Service Searching Press OK
Select Tuner configuration Press OK
Select Tuner A Press OK
Code:
Configuration Mode: Advanced Satellite: Eutelsat W2 16e LNB: 2 DiSEqC mode: 1.2
Stored position: 002
Press OK to store.
OK that's Eutelsat W2 16e setup now to setup Hotbird 13e
Now send dish to Hotbird using Vbox II
Select Setup Press OK
Select Service Searching Press OK
Select Tuner configuration Press OK
Select Tuner A Press OK
Code:
Configuration Mode: Advanced Satellite: Hotbird 13e LNB: 3 DiSEqC mode: 1.2
Stored position: 003
Press OK to store.
You get the idea, now repeat for the rest of the satellites and your done.
This is enough to get you started, the fun starts learning the rest.
Duolabs QBox HD Mini Addons Servers
Duolabs QBox HD Mini Addons Servers
A very rich ADDON repository including OSCam and always the latest Skins , Plugins and Personalizationations !
A very rich ADDON repository including OSCam and always the latest Skins , Plugins and Personalizationations !
Thursday, 5 January 2012
Download CCcam CS Studio by Damirsat ( CCcam Info )
Download CCcam CS Studio by Damirsat ( CCcam Info )
Probably the best version of cccam info around at the moment with loads of extras inc editing tools.
Click the icon that looks like a spanner in the top left corner,, just enter the ip address, port 16001, username and password for the dreambox and click add.
Close cs studio down and restart it, click on the ip address in the top right and click update..

Subscribe to:
Posts (Atom)