Wednesday, 18 July 2012

How to forward CSP profiles cache to Oscam or MCS.

How to forward CSP profiles cache to Oscam or MCS.

How to forward CSP profiles cache to Oscam or MCS.
On CacheCoveragePlugin :
1- Forward to Oscam

<cache-forwarder name="oscam" type="udp" enabled="true">
<host>127.0.0.1</host>
<port>xxxx</port> <!-- where xxx is your Oscam cache port -->
<send-locks>true</send-locks>
<hide-names>false</hide-names>
<profiles>0002-0963</profiles> <!-- black for all profiles or you can write specfic profile name , here we set to sly uk profile -->
</cache-forwarder>
2- Forward to MCS
<cache-forwarder name="Multics" type="udp" enabled="true">
<host>127.0.0.1</host>
<port>xxxx</port> <!-- where xxxx is your MCS cache port -->
<send-locks>true</send-locks>
<hide-names>false</hide-names>
<profiles></profiles> <!-- black for all profiles or you can write specfic profile name -->
</cache-forwarder>
Enjoy ... by Shatanar

How to secure (encrypt) CSP connectors & user xml

How to secure (encrypt) CSP connectors & user xml

The connectors.xml &users.xml can be stored anywhere, as long as it can be accessed via url (e.g file://, http, https, ftp). Optionally, the list can also be blowfish encrypted using the included tool fishenc.jar (found in lib, java -jar fishenc.jar). If encrypted, tracker-key must be correctly set.
In the below example we are going to encypt connectors.xml & users.xml

cd /usr/local/csp/lib
java -jar fishenc.jar /usr/local/csp/config/connectors.xml /usr/local/csp/config/connector.enc 12345 <!-- where 12345 is your tracker key - (password) -->
java -jar fishenc.jar /usr/local/csp/config/users.xml /usr/local/csp/config/users.enc 12345 <!-- where 12345 is your tracker key - (password) -->
Using any ftp program copy the files connectors.xml & users.xml to a different PC rather than your CSP server, then delete the files connectors.xml & users.xml from your CSP server.
Finally update your proxy.xml with:
<user-source name="localusers">
<user-file-url>file:///usr/local/csp/config/users.enc</user-file-url>
<user-file-key>12345</user-file-key>
and
<connector-file-url>file:///usr/local/csp/config/connector.enc</connector-file-url>
<connector-file-key>12345</connector-file-key>
Enjoy..
By Shatanar

HOWTO: Compile OSCAM on Raspberry Pi, Dockstar or similar NAS running Debian

HOWTO: Compile OSCAM on Raspberry Pi, Dockstar or similar NAS running Debian


1. Preparations:

Update apt-list and install required packes:


Code:
apt-get update 
apt-get -y install apt-utils dialog usbutils
apt-get -y install gcc g++ wget
apt-get -y install build-essential subversion libpcsclite1 libpcsclite-dev
apt-get -y install libssl-dev cmake make 
apt-get -y install libusb-1.0-0-dev nano

If you need PCSC support:

Code:
apt-get install pcscd pcsc-tools


2. Get OSCAM source
Now switch to /usr/src, create a directory for oscam and download sources:


Code:
cd /usr/src
svn co http://www.oscam.to/svn/oscam/trunk oscam-svn

3. Compile OSCAM
Now compile oscam for your machine:

Code:
cd oscam-svn
mkdir build
chmod 755 build
cd build
cmake -DWEBIF=1 .. (those 2 dots are required. THIS IS IMPORTANT)
make

NOTE: If you get Errors while compiling e.g.

Code:
--   no libusb 1.0 found. No smartreader support
See the hint at the bottom before proceeding

Now we got our oscam binary
We're gonna move it to /var/local

Code:
cd /usr/src/oscam-svn/build
ls
there should be a file called "oscam"
So lets copy it:

Code:
cp oscam /var/local/
cd /var/local
chmod 755 oscam

4. Make OSCAM start at system startup:
We're adding oscam to rc.local to make it start at system boot.


Code:
nano /etc/rc.local
Now add

Code:
/var/local/oscam &
right above line

Code:
exit 0
Oscam will start everytime the system boots up from now on

5. configs and logfiles
We still need to get some config files.
By default oscam looks in /usr/local/etc for these file

Code:
cd /usr/local/etc
ls
There should be at least 3 files: oscam.user, oscam.server, oscam.conf
If not, copy your configs here

Now we need to create some logfiles and make them writable:


Code:
cd /var/local
mkdir oscam
chmod 755 oscam
cd oscam
mkdir cw
chmod 755 cw
nano oscamuser.log (enter a space and save file)
nano oscam.log (enter a space and save file)
chmod 755 oscamuser.log
chmod755 oscam.log
Thats it

6. Start oscam
You can now run oscam to check if it works

Code:
cd /var/local
./oscam


HINT: Oscam compile error: No smartreader support:
If you get Errors while compiling e.g.

Code:
--   no libusb 1.0 found. No smartreader support
go to /usr/src, get libusb 1.0.6 from sourceforge and compile for your system:

Code:
cd /usr/src/
mkdir libusb
chmod 755 libusb
cd libusb
wget http://downloads.sourceforge.net/project/libusb/libusb-1.0/libusb-1.0.6/libusb-1.0.6.tar.bz2
tar xjf libusb-1.0.6.tar.bz2
make
install
 
After make install of libusb, start over with compiling oscam

Tuesday, 10 July 2012

Useful Ubuntu OScam CCcam Commands

Useful Ubuntu OScam CCcam Commands

Ubuntu System Commands

Power Commands
Shutdown computer
Code:
sudo shutdown -h now
reboot computer
Code:
sudo reboot
or
Code:
sudo shutdown -r 0
Network Configuration
Open network configuration file
Code:
sudo nano /etc/network/interfaces
Restart the network:
Code:
sudo /etc/init.d/networking restart
Updates
Get update software list, enter:
Code:
sudo apt-get update
Update software(s) i.e. apply updates:
Code:
sudo apt-get upgrade
Apply kernel upgrade:
Code:
sudo apt-get dist-upgrade
Upgrade individual software called foo type command:
Code:
sudo apt-get install foo
Ping
Code:
Ping –c3 www.google.ie
Clean
To clear the cache you can use either the clean or the auto-clean op for a command-line program called apt-get. The clean command will remove every single cached item, while the auto-clean command only removes cached items that can no longer be downloaded (these items are often unnecessary).
Code:
sudo apt-get clean
List Devices attached:
Code:
sudo lsusb
Checking open ports on Ubuntu
Code:
netstat -anltp | grep "LISTEN"
Enable root account
Code:
sudo passwd root
Chmod for a folder and all of its subfolders and files?
Code:
sudo chmod 755 -R /whatever/your/directory/is

Oscam/Cccam commands
Update cccam.cfg file?
ftp updated cccam.cfg file to /var/config then run command below:
Code:
/var/script/configupdate.sh
Stop oscam:
Code:
sudo killall -9 oscam
Start oscam:
Code:
sudo oscam –b
Log file:
Code:
tail -f /var/log/oscam.log
Edit oscam.server:
Code:
sudo pico /usr/local/etc/oscam.server
Edit oscam.user:
Code:
sudo pico /usr/local/etc/oscam.user
Edit oscam.conf:
Code:
sudo pico /usr/local/etc/oscam.conf
Update CCcam Channel Info
Code:
wget -O /var/etc/CCcam.channelinfo http://tinyurl.com/csmcu44
Update CCcam Providers
Code:
wget -O /var/etc/CCcam.providers http://tinyurl.com/cgo8ogc
Clean oscam/cccam Log Files
Code:
/var/script/LogCleanup.sh

Friday, 6 July 2012

Alternative method to backup Linux Ubuntu / Debian Server in 5 Easy Steps

Alternative method to backup Linux Ubuntu / Debian Server in 5 Easy Steps.

From time to time you might want to make big changes to your server, changes that might involve risking server stability. You might also want try another Operating System (Switch from Debian to Ubuntu or vice versa) or upgrade from 32Bit OS to 64 Bit OS. Most of these tasks involve the risk of big downtime. I am going to outline a few simple steps to keep downtime to an absolute minimum no matter how big the Upgrade or problem. This Tutorial might seem a bit long winded but it is aimed at the complete novice. After you have done this once, the whole process will take no more than 5 minutes.

Tools you will Need:

a)…Hiren’s Boot DVD 15.1 Restored Edition V 2.0 (Not the genuine version)
Click on the link below to open up a google search window with results for the Torrent file we need (If you wish, you can change “KAT” at the end to your preferred torrent site)
Google
Make sure it is the restored edition, this edition includes all the commercial software that you don’t get with the official Hiren’s Boot DVD.

b)… Blank DVD

c)… USB Key or portable Hard Drive to store the Backup’s on. (I use 8GB USB Key)


Step 1 (Burning the DVD)

Within the folder you will find the “hbcd-15.1-Restored-V2.0-dvd-proteus.iso”. Insert your Blank DVD & burn this iso to a blank DVD with your favourite DVD burning software. (I use windows Disk burner included in Win7, Just right click on the file & click burn disk image) You now have your Hirens Boot DVD.


Step 2 (Creating the backup)

For this step you will need a keyboard, mouse & monitor connected to your Server.


a)… Put the DVD into your server & click CTR+ALT+DEL to restart Server

b)… Press F12 at boot logo Screen to select Boot Device (Might be different on different Systems)

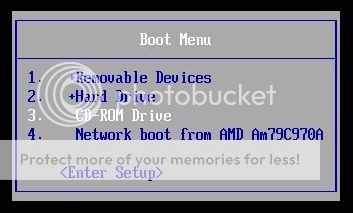
c)… From Boot Device Menu Select CD\DVD Drive & hit enter (This will boot your server from the DVD)


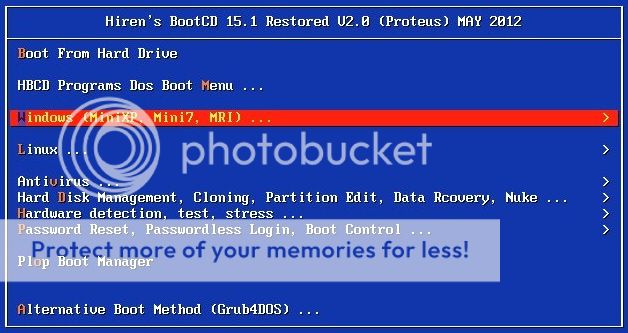
d)… From the first screen, select Windows (Mini-XP, Mini7, MRI)


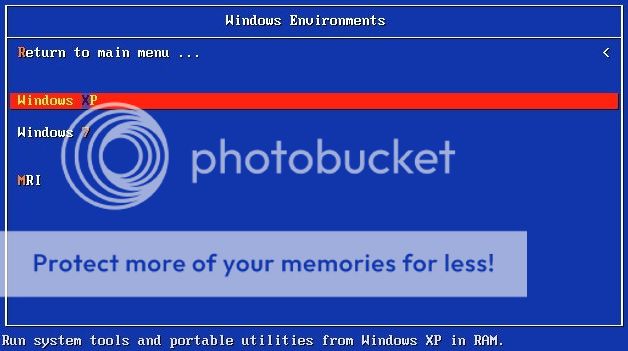
e).. From the next screen select Windows XP


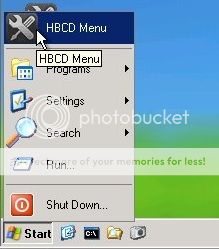
f)… When the Mini XP OS loads, click on the Start button and HBCD


g)… From the HBCD select programs / Backup / Acronis / True image Home


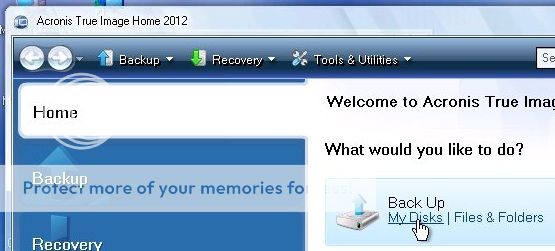
h).. When Acronis True image Home loads, click Backup My Disks


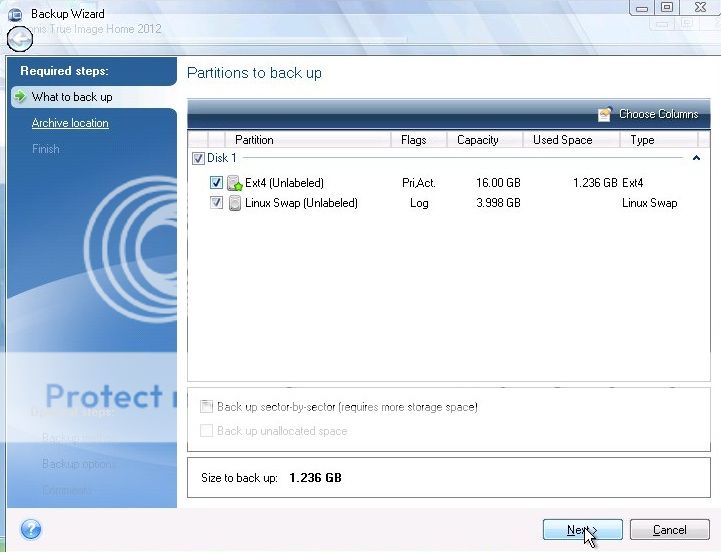
i).. From the next screen, Select your Ubuntu / Debian hard drive


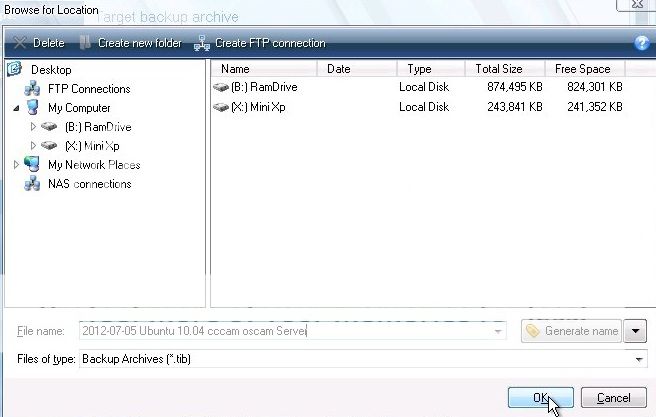
j).. From the new (Browse for location) window select where you want to store the backup, then in the File name box type a name for the Backup image. I usually use todays date followed by a description of the backup.
e.g.(2012-07-05 Ubuntu 10.04 Oscam Cccam)


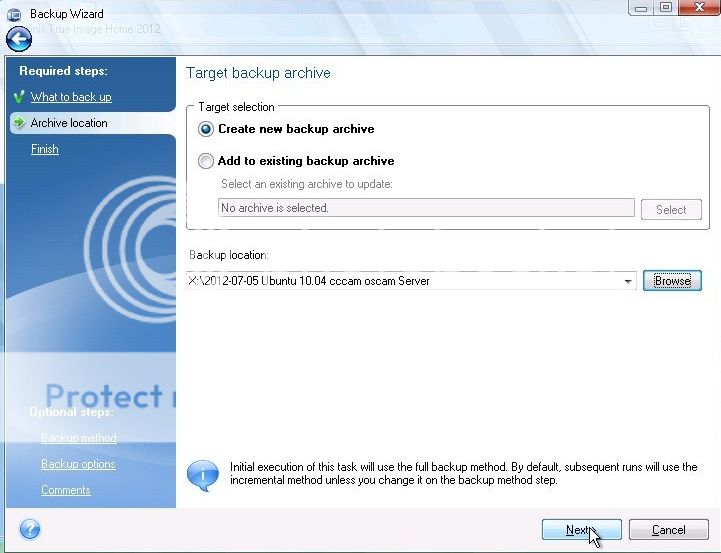
k).. Select Create new backup archive and click Next


That’s it, your Backup has started, it should take no more than 1-2 minutes.


(Restoring the Backup)


Step 3 (Wiping the existing Linux Disk)

Follow Steps (a) through (f) from Step 2 above to start Hirens Boot CD then follow steps below

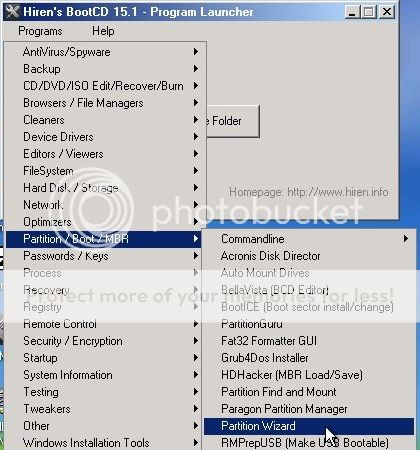
i).. From the HBCD select programs / Partition Boot MBR / Par4tition Wizard


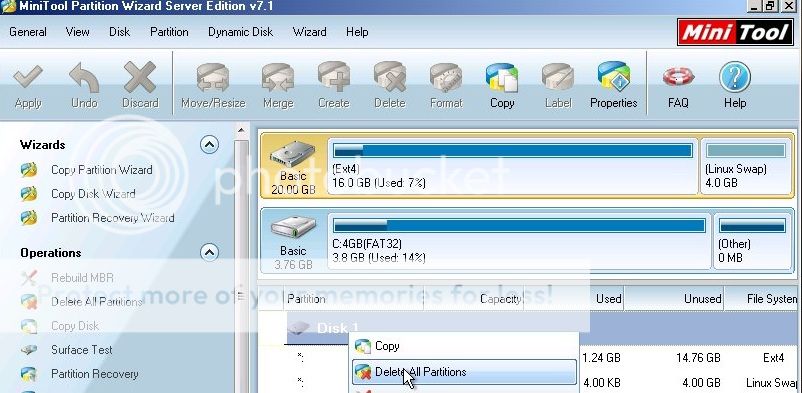
ii).. From the Partition Wizard Window, right click on your Linux Disk and Select Delete all Partitions


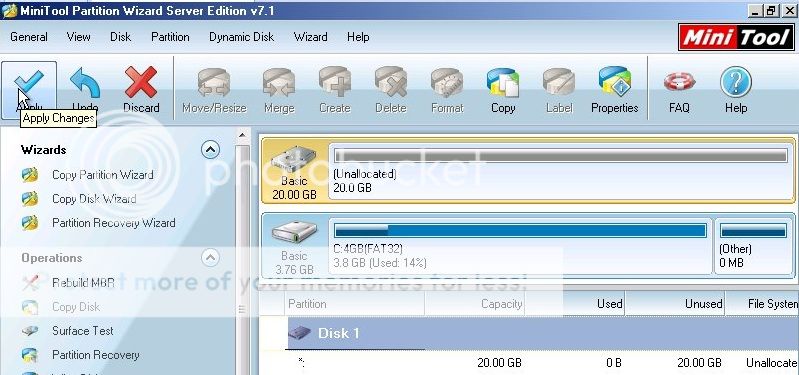
iii).. Next click Apply up the top left and Close down Partition Wizard


Step 4 (Restoring Backup to Wiped Disk)

i).. From the HBCD select programs / Backup / Acronis / True image Home


ii).. When Acronis True image Home loads, click Recover My Disks
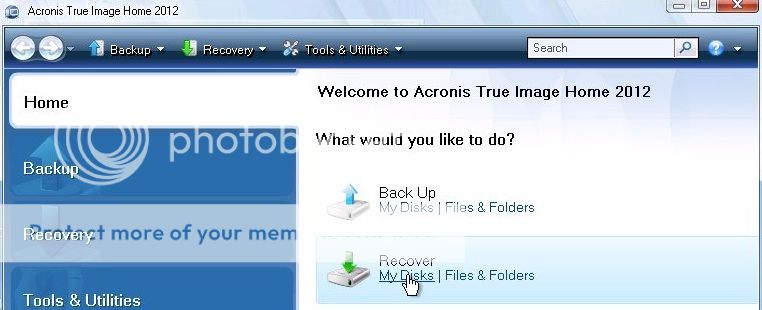


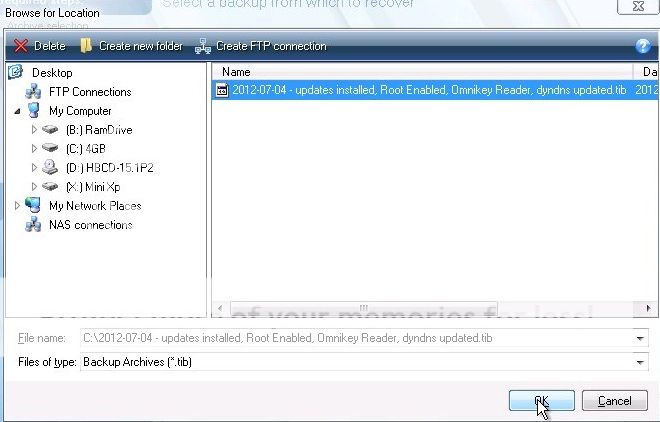
iii) Browse to the backup you want to restore and click OK


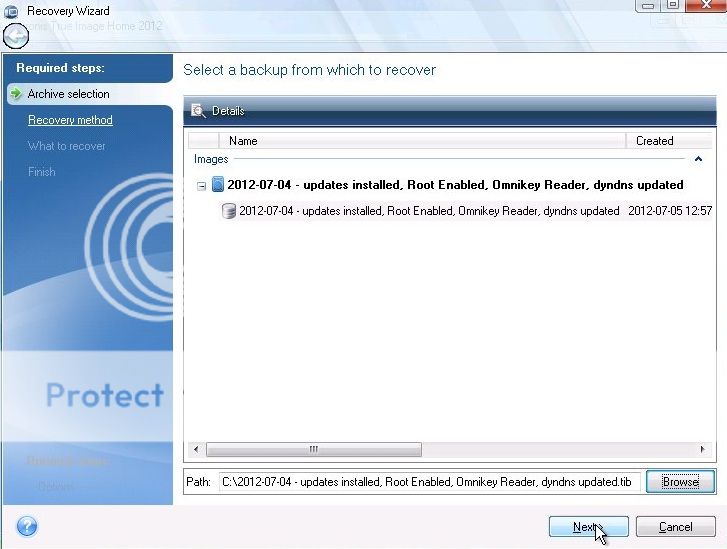
iv).. Click Next on this screen


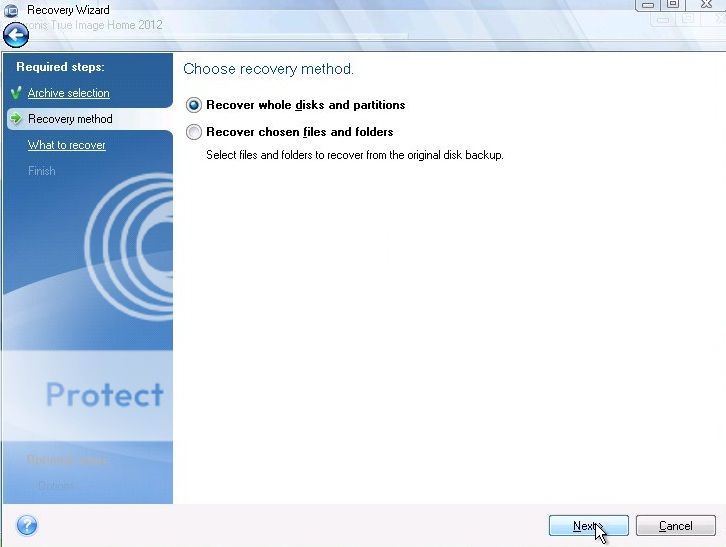
v).. Select Recover whole disks and partitions and click Next


vi).. Select Disk 1 and make sure to select all partitions below it and click Next
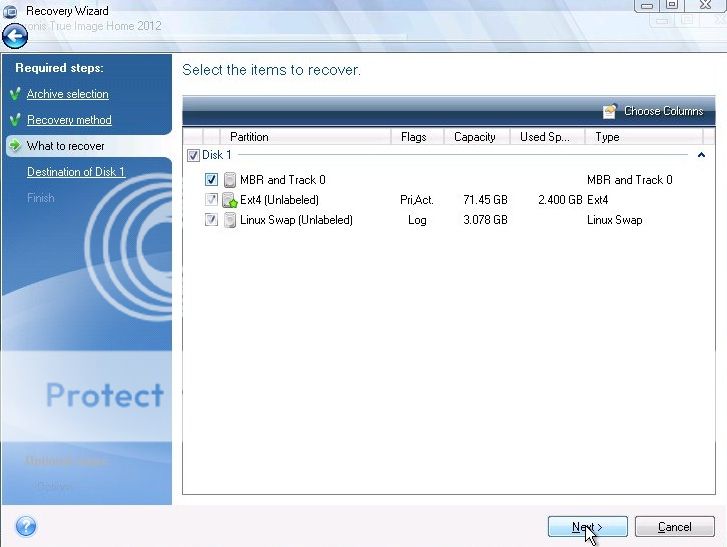


That is the restore process started, again it should take no longer than 2 minutes.

Step 5 Reboot into restored Disk

1).. Remove the DVD
2).. Unplug the USB Backup drive/Key
3).. Click Start / Reboot

That’s it, your Linux System has been restored to the backed up image.

Sunday, 1 July 2012

PELIS A LA CARTA ( Spanish idiom for Videos On Demand )

PELIS A LA CARTA ( Spanish idiom for Videos On Demand )

PELIS A LA CARTA ( Spanish idiom for Videos On Demand )

Another VOD which is still in the making which was originally setup for dreambox but this one considers our Non-English speaking friends also:

PELIS A LA CARTA ( Spanish idiom for Videos On Demand )Version 3.2.12

It links to Spanish,Italian and English sites.

Although initially it was created for Dreambox , the images below were taken from my Vu+ UNO

I have made an IPK so you don´t have to worry about looking for folders!

The procedure is the same for any IPK , FTP to /tmp and install ipk package.
or directly from linuxsat-support addons server in TSpanel.

Do a HARD system reboot not just GUI or some audio might falter.


Always consider that the film/movie/show/documentary is only available if it is kept uploaded and the site link is up-to-date.
Motion Flow depends on several factors ,i.e ; user internet downloading speed/connection ,server uploading speed/connection,etc...

Here are two examples :

Documentaries


Tv shows


Some images may require added plugins for avi , flv or rtsp which I have included the IPKs
If you want to manually install the folder then Ftp the complete folder to /usr/lib/enigma2/python/Plugins/Extensions then hard reboot box, or directly from linuxsat-support addons server in TSpanel.